Revit Floor patterns and materials
Kristine and I worked this out a little farther...
Set the offset height when creating a new floor to 1/4" (element properties in the toolbar- not the option bar) and it will remain 'sticky' - i.e. upon finishing the floor, creating a new floor will retain that value. This offset allows shading of the materials to show when the plan is "viewed in shade mode with edges".. 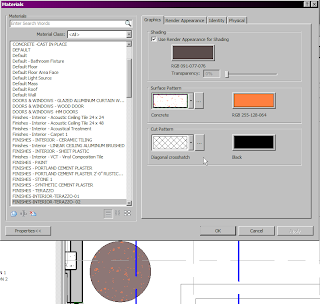

Different colors for the shading and surface patterns drive how the element displays- particularly the hidden line and shaded views. If the floors are co-planar (i.e. the offset is not set) materials will not tag correctly in plan(not even with tabbing.) and solid patterns get lost. (Note the solid hatch pattern + color will override the shading color!)
Sheets can be created in color, and printed in either color or grayscale to easily identify layouts of materials on the floors- no more cryptic hatches!
Maybe we should do a lunch and learn for this or a Revit session? The process has been revised (see below!)
--
Process for creating floor patterns for material tagging (revised):
- Set up your materials first !
- FINISHES-INTERIOR-T-01-TERAZZO-01 (Dashes - no gaps please, all caps too!)
- Use Zero padding in the event more than 9 versions of the material show up. ("01" instead of "1")
- Sync to central!
- Make sure the workset you are working on ins OPENED-
- via the Collaborate tab, select the worksets icon,
- open the workset(s) you need to work with.
- Make sure you are on the workset in the collaborate tab.
- Then either use Floor types or split faces:
- FLOOR TYPES:Set up floor types- Useful where mortar set beds or other recessed areas like showers could become an issue. Separate from the main floor but can be joined to the main floor . Recessed areas of the floor can be tagged using an elevation tag to show the top of the floor and the bottom of the floor relative to the level- so if the floor is slightly raised (i.e. 1/4") and requires a 2" deep bed for mortar setting or shower drainage- it will show it.
SPLIT FACE: start splitting out areas for finishes. This is fast but has a huge drawback - if the floor is deleted all information is lost. Sketches for splitfaces can be stored in groups, if they touch incorrectly or touch a shaft or other joined element they will cause an error.
- Use FINISHES-INTERIOR-[T-01-brief description] for the floor types
- Floor types should have a layer of the material representing the thickness of that material and any set beds. the materials should typically be set to finish2 and can be as simple as one layer thick
- Sketch out the different materials (note Sketch lines cannot intersect )
- FLOOR HOSTED FAMILIES: can be created to utilize materials and create repetitive patterns, constrained to rules, snap to increments ( like VCT inlays) etc.


Comments
Post a Comment